

Custom fields are a very powerful tool in eDesk, allowing you to link additional information to a customer query.
In this help file, we'll show you all the steps to add custom fields into your eDesk account from within the ticket and in the Chat Add-On settings.
Before you start
- You’ll need an Admin login to eDesk. If you don’t have an Admin login, you can request one from an Admin user within your business.
01 How to create a Custom Field?
It's very simple to set up custom fields in your account, simply follow the instructions below:- Click on the Settings→ Smart Tools→ Custom fields.

2. Click the + Add Custom field button in the top right corner and enter the following fields:
- Name: the title of the field you create.
- Type: the format you wish to enter your data in.
- Multiple lines allowed: decide if you wish your custom field to be displayed in one line or not.
- Minimum length: choose your custom field's minimum character length.
- Maximum length: choose your custom field's maximum character length.
Note: some "Types" require further information which will show depending on your selection.
3. And once you're done, simply click Save.
Once created, you can also change the sequence of the custom fields to display them in the order of your choice.
02 How to use a Custom Field in the ticket?
Once created in Smart Tools, the Custom Field option will be available inside each ticket, directly on the right-hand side.
 You can then click the Edit icon to input the data of your choice.
03 How to use a Custom Field in Chat Settings?
Once created in Smart Tools, the Custom Field option will be available in the Behaviour section of the Chat Settings.
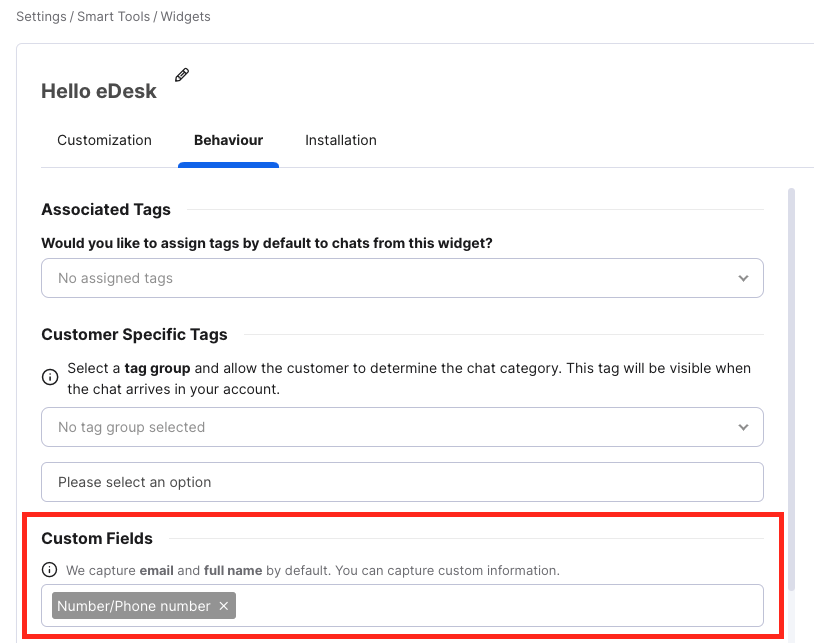
You can then click in the box to select the Custom Field you already created from Smart Tools from a drop-down menu.
Note: The eDesk Chat is available as an Add-On. To find more information, click here.- You’ll need to have access to Smart Tools > Widgets in your Settings. If you don’t have access, you can request it from an Admin user within your business.
04 How to delete a Custom Field?
It's very simple to delete custom fields in your account, simply follow the instructions below:- Click on Settings→ Smart Tools→ Custom fields.
- Click the More options button (three dots) on your chosen Custom Field and hit Delete.
 Note: this will delete all data entered on tickets for this custom field.
05 How to gather data about Custom Fields?
- Go to Dashboard→ Mailbox→ Enterprise Reports.
- Then select Smart Tools→ Custom Fields and date range.
- Click Create.

A CSV file will become available containing ticket information of any tickets where data has been entered in the selected Custom Fields
See an example below:
 Note: Enterprise Reports would be available on the eDesk Enterprise package only. To find out more about this, click here.
Further Readings
If you would like to find out more about responding faster using Snippets, click here.
If you would be interested in learning more about using Message Rules with eDesk, click here.

